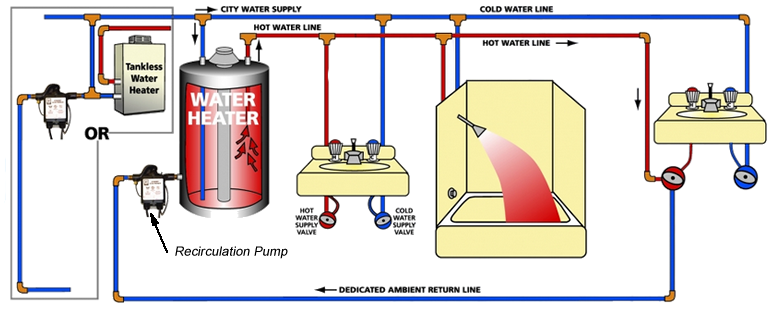
Installing a hot water recirculating pump can significantly enhance the comfort and efficiency of your home’s plumbing system. This device ensures that hot water is readily available at your taps, minimizing wait times and reducing water waste. A hot water recirculating pump maintains hot water circulation in your plumbing system, so you don’t have to wait for it to reach your faucet.
In this article, we’ll explore the installation process, the benefits of using a recirculating pump, and some technical insights that every homeowner should know.
Preparing for Installation
Before diving into the installation process, it’s important to gather the necessary tools and materials. You will need a hot water recirculating pump, adjustable wrenches, pipe fittings, Teflon tape, and possibly a pipe cutter. Additionally, having a bucket on hand can help catch any residual water during the installation.
Before you start, it’s crucial to turn off the power to your water heater and shut off the main water supply to your home. This will ensure a safe working environment and prevent any accidental leaks.
Hot water recirculating pump installation steps
Locate the Water Heater: Begin by identifying the hot water outlet pipe coming from your water heater. This pipe is typically connected to the top of the heater and carries hot water to your fixtures. Understanding your plumbing layout is essential for a successful installation. Take a moment to trace the route of the hot water line to ensure you know where to connect the recirculating pump.
Cut the Pipe: Using a pipe cutter, carefully cut the hot water outlet pipe where you plan to install the recirculating pump. Make sure to leave enough space for the pump and any fittings needed. A clean cut will help prevent leaks, so take your time to ensure the edges are smooth. If you’re unsure about where to cut, consult the pump’s installation manual for recommendations on placement.
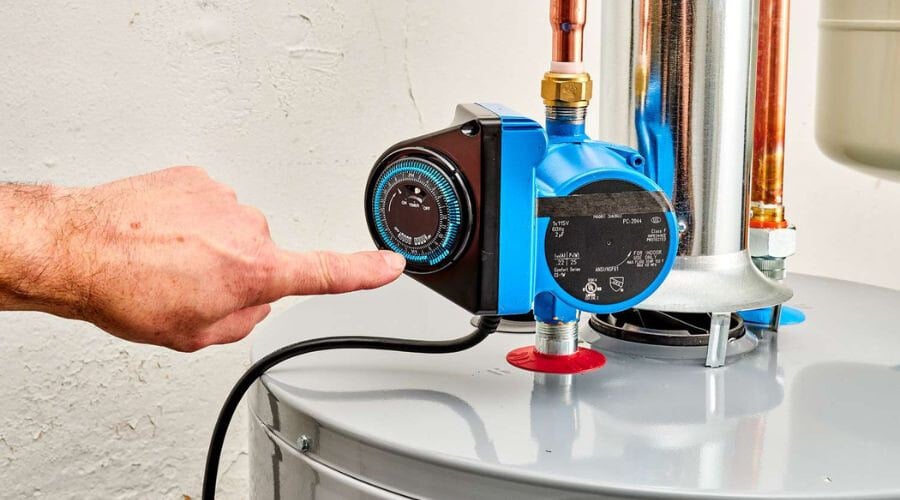
Install the Pump: Position the recirculating pump onto the cut section of the hot water outlet pipe. Ensure that the pump’s inlet and outlet are oriented correctly according to the manufacturer’s instructions. The pump should be installed in a way that allows easy connection to the return line. Some pumps come with mounting brackets; if so, secure the pump to the wall or floor for stability. Proper alignment is crucial, as misalignment can lead to operational issues.
Secure Connections: Before making the final connections, apply Teflon tape to the threads of the fittings. This tape creates a watertight seal, preventing leaks. Use your adjustable wrench to tighten the connections, but be cautious not to overtighten, as this can damage the fittings. It’s better to ensure a snug fit without excessive force. After tightening, double-check each connection to ensure they are secure.
Connect the Return Line: The return line is crucial for the recirculation process. This line should run back to the cold water inlet of your water heater. Depending on your plumbing configuration, you may need to install additional fittings to connect the return line properly. Make sure to route the line in a way that avoids kinks or sharp bends, which can impede water flow. Consider using flexible piping if tight spaces make it difficult to achieve a straight run.
Consider the Expansion Tank: If your plumbing system requires it, consider installing an expansion tank. This tank helps manage pressure in your plumbing system, especially when water is heated and expands. If your system already has an expansion tank, check that it is functioning properly. A well-functioning expansion tank will prevent excessive pressure that could lead to leaks or bursts. If you need to install a new expansion tank, follow the manufacturer’s instructions for proper placement and connection.
Restore Water Supply: After making all connections, it’s time to restore the water supply. Turn on the main water valve slowly and check for leaks around the pump and fittings. If you notice any leaks, tighten the connections as necessary. It’s important to ensure that everything is secure before proceeding. Allow the system to fill completely, and keep an eye on the pump to ensure it starts operating correctly.
Test the System: Finally, restore power to your water heater and allow the system to heat the water. Once the water reaches the desired temperature, test the faucets in your home. You should notice that hot water is available almost immediately, confirming that your recirculating pump is functioning correctly. If there are any issues, double-check your connections and the orientation of the pump. It may take a few minutes for the system to fully adjust, so be patient during this testing phase.
Conclusion
Installing a hot water recirculation pump is a practical and beneficial improvement for any home. With the ability to provide instant hot water and reduce water waste, it improves both comfort and efficiency. By following the steps outlined in this guide and considering the role of an expansion tank, you can ensure a successful installation that will serve your home for many years to come.
If you want to continue learning about plumbing, I invite you to read our article on potable water where you will learn about more plumbing systems for the home. We look forward to seeing you!


0 Comments