Replace copper pipes with PEX for a rewarding project that enhances your plumbing system’s efficiency and durability. This guide provides detailed steps to help you navigate the process smoothly.
Why Replace Copper Pipes with PEX?
Copper has been a staple in plumbing for decades, but PEX (cross-linked polyethylene) has emerged as a superior alternative for several reasons. One reason is flexibility – PEX can be bent around corners and obstacles, significantly reducing the number of fittings needed. This flexibility makes installation quicker and easier, especially in tight spaces.
On the other hand, it is resistant to corrosion – unlike copper, which can corrode over time, PEX is resistant to scale and chlorine, ensuring that it maintains its integrity and functionality for years to come.
Mainly for these two reasons, replacing copper pipes with PEX is a good idea. It is also generally cheaper than copper, both in terms of material and labor costs. The installation process is simpler, which can lead to lower overall expenses.
Preparing for the Replacement
Before diving into the replacement process, ensure you have the necessary tools and materials on hand:
Tools Needed:
- PEX Tubing Cutter: For clean cuts on PEX tubing.
- Copper Tubing Cutter: To remove the copper pipe sections.
- Drill-Driver: For securing any fittings or straps.
- Wrench: To tighten connections.
- Marker: For marking cuts on the pipes.
Materials Required:
- PEX Tubing: Choose the appropriate diameter for your plumbing system.
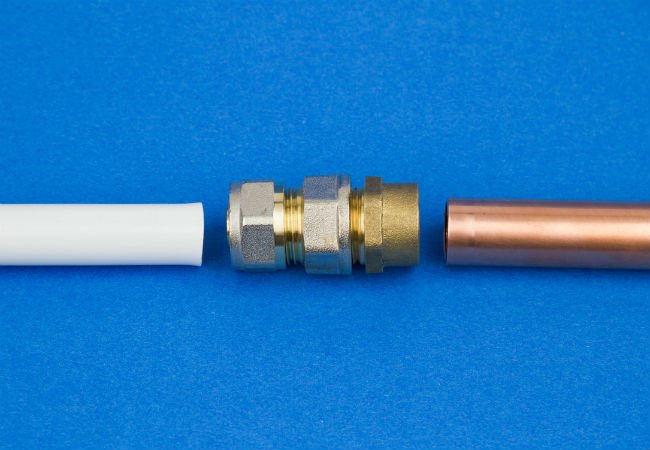
- Push-Fit Connectors: These connectors allow for easy joining of PEX to copper without soldering.
- Copper Pipe Straps: To secure the pipes in place if needed.
Safety Precautions:
- Always wear safety goggles and gloves to protect yourself from debris and sharp edges while cutting pipes.
- Ensure the work area is well-ventilated, especially if you’re working in confined spaces.
Step-by-Step Guide to Replace Copper Pipes with PEX
- Turn Off the Water Supply
Before starting any plumbing work, locate the main water shut-off valve and turn it off. This step is crucial to prevent flooding and ensure safety while you work. If your plumbing system has branch shut-off valves, you can also use those to isolate the section of pipe you will be replacing.
- Drain the Pipes
Open a faucet at the lowest point in your home, such as a basement sink or outdoor spigot. This will allow any remaining water in the pipes to drain out. Additionally, flush toilets to empty the tanks and reduce any residual water pressure.
- Cut the Copper Pipe
Using the copper tubing cutter, mark the section of copper pipe that you need to remove. Ensure your marks extend beyond any visible corrosion. Position the cutter around the pipe and rotate it, tightening it gradually until the pipe is severed. If you encounter vertical pipes, support them with straps to prevent them from sliding down.
- De-Burr the Edges
After cutting, it’s essential to smooth the cut edges of the copper pipe. Use a de-burring tool to remove any sharp edges or burrs, both inside and outside the pipe. This step is vital for ensuring a leak-free connection when you replace copper pipes with PEX.
- Measure and Cut the PEX Tubing
Measure the length of PEX tubing needed to replace the section of copper pipe. Remember to account for the connectors, and always cut the PEX slightly longer to allow for expansion and contraction. Use a PEX tubing cutter for a clean, straight cut, which will ensure a proper fit with the connectors.
- Connect PEX to Copper
Insert a push-fit connector onto one end of the copper pipe. Make sure the connector is fully seated and reaches the marked depth line. Next, insert one end of the PEX tubing into the other side of the connector, pushing it all the way until it meets the depth line. This connection method is simple and requires no special tools, making it ideal for DIYers.
- Make Fixture Connections
If the section of copper pipe you replaced fed any fixtures (like sinks or toilets), you’ll need to connect those lines to the new PEX tubing. Use a PEX tubing cutter to create a branch line, and install a push-fit tee fitting to connect the fixture supply lines to the PEX. Ensure all connections are secure and properly aligned.
- Test for Leaks
Once all connections are made, turn the water supply back on slowly. Check each connection for leaks. If you notice any water seeping, turn off the water and recheck your fittings. Tighten or adjust as necessary.
Conclusion
Replacing copper pipes with PEX can significantly improve your plumbing system’s reliability and efficiency. By following these detailed steps, you can confidently tackle this project, enhancing your home’s plumbing while enjoying the benefits of modern materials. Embrace the opportunity to replace copper pipes with PEX, and enjoy a more durable, cost-effective plumbing solution!


0 Comments